|
|
Paper Umbrellas |
Page revised 05/03/2016
|
|
Paper Umbrellas |
|
|
How to use Half Scale (or any Scale)
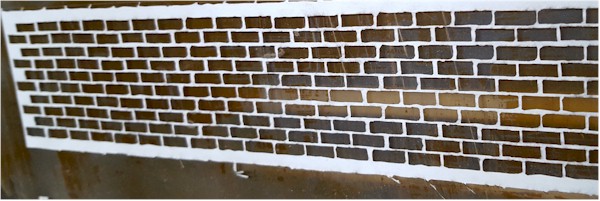
Brick Tape |
|
| 1. Paint the area you want to brick with a flat
hobby paint of your choice. This color will be the color of your mortar
between the bricks. 2. Leaving 1/4 to 1/2 inch at the end, peel the brick tape lattice stencil from the backing, and place it at the bottom of your brick project. You will need that 1/4 to 1/2 inch to grab to pull the stencil back off later one so don't forget to leave it sticking out at the end. We recommend that you only do one side of the project at a time. If the project is taller than the brick tape, peel a second strip and carefully place the first mortar row over the top row of the last piece of brick table so that there is only one line of mortar between tapes. Be sure that your bricks are staggered so that you don't have any vertical brick mortar in lines. The vertical rows should be staggered. Continue on until you reach the top of your project. 3. Adding the brick mixture (see below for how to mix the brick mixture). With a knife, trowel or any other flat tool that you are comfortable using, spread the brick mixture starting at the top of your project and working your way down to the bottom of the project. Work quickly. You do NOT want the brick mixture to dry completely. The brick should be about 1/16 of an inch to 1/8 of an inch thick.** 4. When that side of the project is covered with brick mixture, starting at the top, grab the 1/4 to 1/2 inch you left at the end, and peel the lattice stencil off one layer at a time. The brick mixture should have set up some but NOT be completely dry. Once you have all the lattice stencil off, let the brick dry completely. However you can start another side of your project. Be careful at the corners to make sure that your bricks line up to give a proper looking corner and make sure that you continue the staggered brick patter to the next side of your project. 5. Once the brick is completely dry, you can dry brush paint on some of the bricks to give the effect of different color of bricks, or shading for new/used brick. If you paint, let the paint dry completely. 6. Once the brick looks like you want it to, and the paint and brick are completely dry, spray the brick with a good acrylic sealer. Your brick will give you years of beautiful Bricks. Brick Mixtures: Magic Brik Mixture. I've arranged to buy just the brick mixture from Magic Brik. It comes in a 6 ounce package and covers 1 square foot. To use the brick mixture you mix small amounts with water. Only mix what you think you can use in a few minutes. I've found that empty small butter tubs with lids make great containers to mix the Magic Brik in because it will not harden immediately if you have extra and keep it covered. You mix just a few drops of water at a time. The mixture should be similar to the consistency of cake icing. You want it to spread but not drip. Magic Brik comes in red or white. If you use white, you can add a small amount of paint to have different color base bricks. Then you can add shading in other colors after the bricks are dry. Alternately, you can use ready mixed Joint Compound or Spackle. They come in small containers that cost about $4-$6 and are available at Lowes, Home Depot or any paint or hardware store. They basically work the same way. They come ready mixed and are easy to spread and wash up with water. On variation is if you want a more sanded product like the Magic Brik, you can place a small amount of the joint compound or spackle into an empty butter container, and mix about a teaspoon of very fine play sand into the joint compound or spackle. You may need to add a few drops of water to bring the mixture back to a good spreading consistency. Since these products are white or off white, you can add small amounts of paint to color your brick before you apply it to the lattice stencil. ** A variation on smooth brick walls, if you want your brick to look like a very old broken down building, vary the thickness of your brick mixture as you spread it. Once you remove the lattice the remaining brick will look uneven like it is very old and some of it has worn away by age and weather.
|
||
|
NEED INSTRUCTIONS for a Dollhouse Kit that came without
them? |
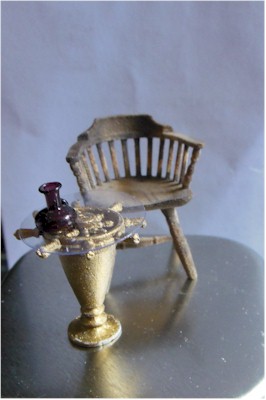
| From Laurie Sission: Some ideas on how to make Cruise Themed tables. | |
| "It is the ships small wheel
K-40XS
on top of the Tulip Glass
F-52.
A quick spritz of
Fusion Paint made a perfect primer. Then I used regular craft paint in
brown, brushed with gold for the wheel. The base is all gold. The "glass"
top is cut from a scrap of packing plastic. I am also using the shake glass F-53 as the base for the larger ships wheel to make a half inch side table. If you use the life preserver, they make nice tops as well. All sorts of Cruise Themed tables from these pieces. The shake glasses made sturdy bases used either way." NOTE: The ships wheels and life preservers also come in one inch scale too. You would need a larger base on them. |
|
|
|
|
| From Jill Castrel: When making faux leather for
furniture or when using thin leather for small scale furniture:
If you have little glue spots to hide you could trim seams with
very small roping like 1 strand of embroidery floss or bunka. Or you
could fashion a miniature quilt throw using the faux fabric technique in
the instructions - instead of cutting a pattern from the "fabric" cut a
square, crease folds in it, and drape over the arm of the chair tacking in
place with a little glue. I have used this to make 1/4 scale quilts on a quilt rack to great affect. Probably should mention this on the half scale group - some might find it useful. |
| Another way to remove wallpaper: Oh Yay!!!!!!!!!! Excuse me for not recalling the persons name, but suggesting I use cheap fabric softener to remove wallpaper from a roombox. It took me about 10 minutes to do all 3 walls. It could not have been easier. Terrific tip!!!! Thanks again!!!! Kate Henry |
|
TIP: 6 foot man in |
|
Scrubby for holding flower, etc. tip...Gerry Schipper 2/21/2010 Finally, a use for the scrubbys that come with our scrubby holders! Works perfectly for holding flower stems to dry with the leaves on them. |
 |
| Brush Cleaning Tips - Submitted by Gerry Schipper |
| So...what I need is a way to get them into water but only
the ends (so the handles don't get too wet) and with the brush off the bottom so they don't get bent. What worked??? I put a little blue tac on the inside of the water glass and attached the brush...so any brush can be positioned JUST RIGHT! There is another easy way to suspend a brush in a bottle of cleaning solution so the bristles won't get bent. Get an inexpensive BABY BOTTLE... the kind with a screw-on nipple. Cut a small X in the end of the nipple just big enough to push the end of the brush handle through. Fill the bottle with 1/3 to 1/2 liquid. Push the brush handle into the nipple, adjust it so it is held where you want it, then screw the nipple back on. No more bent bristles! Now what I use personally (Gerry speaking) for rinsing while painting is: After I pour the last of my fabric softner into laundry...I take the bottle and fill with water and use this water in my paint rinsing cup. I got the softner tip from The Guys from TX. There seems to be enough softner left in the bottle to do the trick and keep bristles soft. I usually wash them with Dawn detergent when done painting.
Straightening a brush; Wet your brush and put a little dish soap on it,
then put it in the
|
|
|
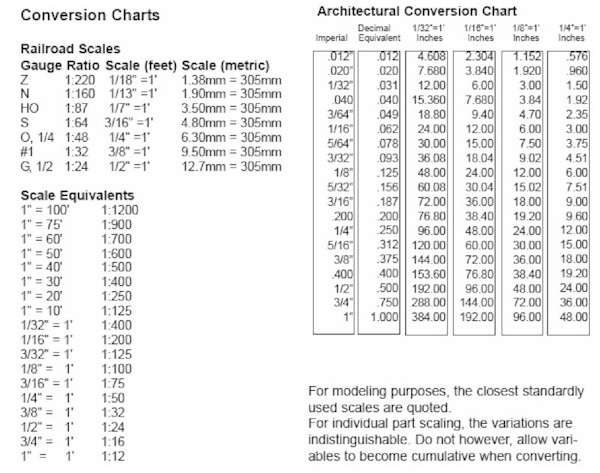
| Note: N-Scale (depending on the manufacturer) is 1:148 to 1:160 |
|
Some of you might find this conversion chart to be of some
use. |
Back to Virtual Dollhouse
These pages are not abandoned. They are historical pages that do not change.